Tuesday, March 22, 2011

Surface Textures for Anodised Jewellery


Texture techniques is such an important part of my work and I am forever looking for new alternatives to add to the uniqueness of my pieces.

Specially made texture hammers are a great product on the market, I enjoy the challenge of making as many patterns from the one texture by transferring the texture in different angles, and combining one texture with another. Add a stamped letter or number into the texture for a one-of-a-kind look.

I have fun experimenting with my rolling mill, which is a much quicker and definitely quieter method – one that I’m sure my neighbours prefer. One of my favourite textures made with the rolling mill is putting the metal through the wire rollers where raised lines of different thicknesses are formed. Lace and wire netting is also a popular material I use either in the rolling mill or using a hammer to force the creation of the texture.

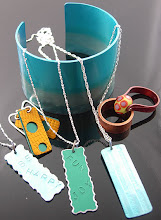
My latest pieces -


Anodised Aluminium Earrings


Anodised Aluminium Rings


Anodised Aluminium Cuffs


Anodised Aluminium Cuffs


Saturday, February 26, 2011

Anodised Aluminium Cuffs


I'm preparing to make a few sets - cuff, ring and earrings, ready to submit to galleries. I have some cuffs complete and love the different colour combinations.

The red on black cuff was inspired by, and will be a gift to, an Australian celebrity and fashion designer, who has a stunning public presence.

Now that I have my PH Meter I find I am forever changing the PH balance of my black anodising dye, but at least it is now giving me excellent results. I wonder what my next challenge will be.


Top cuff in Bronze and Copper; Left in Red on Black; Right-Black on Red

Sunday, February 13, 2011

Anodising Trials and Tribulations!


Anodising aluminium is such a fickle process, one little thing goes wrong, and the whole anodising process has to be repeated. Admittedly, I do love the challenge and the new knowledge it brings. I think it would be a sad moment when you felt you had all the knowledge you could possibly have on one subject, if there was nothing else to learn, what satisfaction would you have continuing with it?

This weeks problem was that a dye I'd recently purchased and which had been giving excellent results has not been successful on my last 2 attempts. With the anodising process, this could be contributed to many things, but as with all things the more experience you have it becomes a little easier to pinpoint. My suspicion was that the PH balance wasn't correct in the dye. Another purchase necessary, a PH meter, which proved my theory to be correct. Ah the trials and tribulations of anodising!

I have enjoyed experimenting with duo colours, a lengthy but intriguing process, where the item is dyed, then dried, a rubber cement ran over areas where the base colour will be retained. Then the piece is placed in diluted ammonia to remove the remainder of the dye, then redyed and sealed. Once the sealing process is complete then the messy job of removing the rubber begins! I did show a cuff done with this method in my last post, here are a few more examples of my anodised jewellery in two colours.


Anodised Aluminium 'Peace' Ring


Anodised Aluminium Ring


Vibrant Anodised Aluminium Earrings


Blue and Gold Anodised Aluminium Earrings


Funky Anodised Aluminium Cuff


Green and Blue Anodised Aluminium Cuff

Saturday, February 5, 2011

Continuing the Anodising Saga.....


It's been a long time since I've added to my blog, but I have continued with my anodising venture. There were many hurdles to climb over along the way but it has all been worth it.

My turning point was about 18 months ago when it was brought to my attention an anodising course was being taught at the Jam Factory here in Adelaide. I joined the course in hope to iron out the few problems that I could not find a solution for.

The biggest fact I learnt was there is actually two different methods of anodising aluminium, the LCD method I was following and the 'old method' which was taught in this course. The major differences being, instead of measuring the surface being anodised and using a calculating table to define the setting of the amps on the power supply and the length of time the anodising should run, it was a simple 10 Volts for 1 hour.

Taking that on board and adding a small aquarium pump for the agitation of my anodising bath, has made the difference between failure and success.

Another great tip I came away with was whilst working on aluminium pieces, cutting, filing and sanding, etc. When the pieces are hard worked and require annealing, aluminium does not indicate annealing temperature by changing colour as most other metals do, making it difficult to calculate when melting point is nearly reached. To remedy this, rub the pieces with moistened soap, anneal until the soap becomes dark brown almost black, then take the flame away, perfectly annealed.

Here are a few of my recent anodised pieces -


Anodised aluminium ring with one of my lampwork beads


Anodised aluminium cuff bracelet


Anodised aluminium earrings


Anodised aluminium pendant on a sterling silver snake chain


Anodised aluminium necklace joined with titanium links


Tuesday, October 7, 2008

Disc Cutter


A disc cutter has been on my wish list for some time now, and I recently purchased one and am now wondering how I've lived so long without it! The one I chose has a clear perspex top as opposed to the majority I have seen which have metal as the uppermost layer. I'm very glad I made this choice as it's a big advantage to be able to actually see to line up your sheet, and in the case of cutting a circle out within another circle, it's a must to be able to visually line it up.


A circle punched within a circle


This particular disc cutter is able to cut circles to the sizes of 1/8"; 3/16"; 1/4"; 5/16"; 7/16"; 1/2"; 5/8" and 3/4" and neatly stores in it's own case.


Disc Cutter Case


Disc Cutter Set


It's a simple process to follow, just slip the metal in between the top perspex layer and the bottom metal base, lining it up with the required size hole.


Sheet Metal inbetween the layers


The cutter punch has a bevelled end and a straight end. Place the straight end into the hole.


Bevelled Edge


Straight Cutting Edge


Place staight edge in first


In all the instructions I have read for disc cutters it mentions only a couple of hits with the hammer is needed. I am using aluminium sheet in mine, so that may be harder to cut than silver sheet, but my experience so far is it requires a lot more than a couple of blows with the hammer, or maybe I'm too light with the hammer as I find it needs several hits before completely cutting through, and the disc will drop through.


Strike several times with the Hammer


I found the most challenging part of the process was releasing the cutter punch once the disc has been successfully cut. I've now solved that problem. I looked for a piece of dowel but settled on a small piece of tree branch instead.


Stick with a straight end


I then placed this on the cutter punch and hammered the punch right through. You may need to place a block of wood under the edge of the cutter to give enough height for the punch to safely drop through on a bench top. It should come out quite quickly and easily.


Releasing the Cutter Punch


I purchased my cutter from Carol Braden of Mastery Tools on Ebay US. If she doesn't have any listed at the moment I'm sure she wouldn't mind if you emailed enquiring about them.


Friday, October 3, 2008

Working with Aluminium


While I am having a slight hiatus in my aluminium anodising project due to waiting for the arrival of 200 litres/ 52 gallons of distilled water, I have another aluminium necklace and earrings in the making.


Domed Discs, drilled, filed, sanded and polished


I'm loving working with aluminium, it is such a soft metal to manipulate, and so very light. I have given these pieces a final polish on my electric wheel, using a green bar compound. I've then soaked them in thinners to remove the polish grime as this will prevent anodising if it does not have a clean surface.

I'm planning to anodise these pieces in a combination of violet and blue, but at this stage of course I'm still waiting to succeed in achieving a result I am happy with before I can finally put my pieces together.

Hey, it's my birthday today!! :-)


Tuesday, September 30, 2008

Back to Weaving


I have had this piece sitting on my work board half finished for a few weeks now, so I thought it was time to put some concentration into completing the necklace.


'Scarlet' Woven Necklace


Close up of the centrepiece of 'Scarlet'


This piece is finger woven with lava, coral and red aventurine together with my handmade lampwork beads. Hundreds of Japanese seed beads have been added into the mix.

The latest on my Anodising quest -

This has certainly become one of my biggest challenges I have taken on. It is not nearly as easy as it first seemed. I have replaced my battery charger with a 30V/5 AMP controllable power supply as a more reliable power source. I am now using the 720 Rule Anodising Calculator to enable me to apply the correct amp and voltage settings according to the surface area of the pieces. It has just been pointed out to me that I was calculating it without taking in consideration that the surface area equals both sides of my pieces, therefore I needed to double my calculation.


Power Supply


My head is swimming right now, there are so many variables and I still haven't had the success I'm after. It's constantly back to the drawing board, but I have learnt so much and obviously need to learn much more. I think I could write a book with all that I have learnt so far!