
It's been a long time since I've added to my blog, but I have continued with my anodising venture. There were many hurdles to climb over along the way but it has all been worth it.
My turning point was about 18 months ago when it was brought to my attention an anodising course was being taught at the Jam Factory here in Adelaide. I joined the course in hope to iron out the few problems that I could not find a solution for.
The biggest fact I learnt was there is actually two different methods of anodising aluminium, the LCD method I was following and the 'old method' which was taught in this course. The major differences being, instead of measuring the surface being anodised and using a calculating table to define the setting of the amps on the power supply and the length of time the anodising should run, it was a simple 10 Volts for 1 hour.
Taking that on board and adding a small aquarium pump for the agitation of my anodising bath, has made the difference between failure and success.
Another great tip I came away with was whilst working on aluminium pieces, cutting, filing and sanding, etc. When the pieces are hard worked and require annealing, aluminium does not indicate annealing temperature by changing colour as most other metals do, making it difficult to calculate when melting point is nearly reached. To remedy this, rub the pieces with moistened soap, anneal until the soap becomes dark brown almost black, then take the flame away, perfectly annealed.
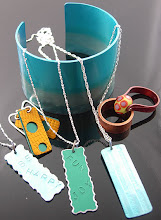
Here are a few of my recent anodised pieces -


No comments:
Post a Comment