
Persistence and constant research has finally paid off, I have successfully anodised my aluminium test piece.

I made a few changes to my set up, firstly I changed the aluminium bar to an aluminium angle which I thoroughly cleaned. The reason for changing the bar I was using previously was due to an extra ridge on the aluminium which I felt might have reduced the current flow.

I cut a larger piece of roofing lead and folded it over several times, this was advised in research material I had read.

A major change which I believed contributed to the success, was changing from aluminium wire to titanium wire for use in the racking system. Titanium apparently conducts the electrical charge more efficiently, whereas aluminium has a tendency to lose the current flow. Titanium is more expensive than aluminium, I paid $15.00 for a metre at A&E Metals, but it was well worth the extra expense. The wire can be used over and over again by cleaning it with steel wool after each anodise.

The final major improvement was purchasing the correct anodising dyes. These are available from Caswell Inc. If you live in the U.S., the dyes are out at a very cheap price at the moment. Unfortunately the same special price does not spread to Australia. As Caswell has a distributor in Australia they do not allow us to buy from the U.S. site, so Aussies can expect to pay more than double the price at $18.00 per colour, as opposed to $7.45 in the U.S. Worthwhile buying the correct dyes and also Sealer which is also available from Caswell. Once you have soaked the anodized aluminium pieces in the dye for approx. 15 minutes, the piece is then transferred to the sealer mix which has been brought to boiling point on the stove. Retain the boil and immerse the piece for just a few minutes.
I found an anodising procedure chart in The Complete Metalsmith by Tim McCreight handbook. As I no longer have a working scanner, I photographed it, brought it into Photoshop and added some extra notes, printed and placed into a plastic sleeve. This has been invaluable on my workbench throughout the procedure, as I can't rely on my memory. I move straight from the Dye process to the Seal, with no rinsing in between or after the Seal.

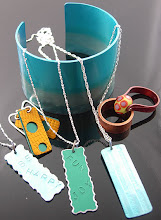
The finished anodised results will reflect the amount of work put into the preparing of the aluminium before the anodising process begins. My sample piece has far from a perfect finish as I put very little effort in sanding and preparing the piece as it was simply a practise piece. I am now moving on to my first necklace project incorporating anodised aluminium, these pieces will have to be fastidiously prepared with all sawing, filing, forming and other finishing techniques completed before the anodising process can begin.
Although I have felt a great deal of frustration with all my failed attempts with the anodising process, finally having a success has really made it all worthwhile. I've learnt some valuable lessons, the main one being do not cut corners by purchasing products which aren't the 'Real McCoy'. I would have saved a lot of time if I had the correct wire and dyes to begin with, but in saying that having to analyse each step to fathom where I had gone wrong, really increased my knowledge of the process.
I hope you have enjoyed travelling my journey with me!

1 comment:
A fantastic post. Thank you for sharing. I have only just started using textured aluminium. Don't know whether I want to go with the chemicals. Scares me quite a bit.
Post a Comment