Tuesday, October 7, 2008

Disc Cutter


A disc cutter has been on my wish list for some time now, and I recently purchased one and am now wondering how I've lived so long without it! The one I chose has a clear perspex top as opposed to the majority I have seen which have metal as the uppermost layer. I'm very glad I made this choice as it's a big advantage to be able to actually see to line up your sheet, and in the case of cutting a circle out within another circle, it's a must to be able to visually line it up.


A circle punched within a circle


This particular disc cutter is able to cut circles to the sizes of 1/8"; 3/16"; 1/4"; 5/16"; 7/16"; 1/2"; 5/8" and 3/4" and neatly stores in it's own case.


Disc Cutter Case


Disc Cutter Set


It's a simple process to follow, just slip the metal in between the top perspex layer and the bottom metal base, lining it up with the required size hole.


Sheet Metal inbetween the layers


The cutter punch has a bevelled end and a straight end. Place the straight end into the hole.


Bevelled Edge


Straight Cutting Edge


Place staight edge in first


In all the instructions I have read for disc cutters it mentions only a couple of hits with the hammer is needed. I am using aluminium sheet in mine, so that may be harder to cut than silver sheet, but my experience so far is it requires a lot more than a couple of blows with the hammer, or maybe I'm too light with the hammer as I find it needs several hits before completely cutting through, and the disc will drop through.


Strike several times with the Hammer


I found the most challenging part of the process was releasing the cutter punch once the disc has been successfully cut. I've now solved that problem. I looked for a piece of dowel but settled on a small piece of tree branch instead.


Stick with a straight end


I then placed this on the cutter punch and hammered the punch right through. You may need to place a block of wood under the edge of the cutter to give enough height for the punch to safely drop through on a bench top. It should come out quite quickly and easily.


Releasing the Cutter Punch


I purchased my cutter from Carol Braden of Mastery Tools on Ebay US. If she doesn't have any listed at the moment I'm sure she wouldn't mind if you emailed enquiring about them.

Friday, October 3, 2008

Working with Aluminium


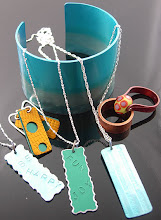
While I am having a slight hiatus in my aluminium anodising project due to waiting for the arrival of 200 litres/ 52 gallons of distilled water, I have another aluminium necklace and earrings in the making.


Domed Discs, drilled, filed, sanded and polished


I'm loving working with aluminium, it is such a soft metal to manipulate, and so very light. I have given these pieces a final polish on my electric wheel, using a green bar compound. I've then soaked them in thinners to remove the polish grime as this will prevent anodising if it does not have a clean surface.

I'm planning to anodise these pieces in a combination of violet and blue, but at this stage of course I'm still waiting to succeed in achieving a result I am happy with before I can finally put my pieces together.

Hey, it's my birthday today!! :-)


Tuesday, September 30, 2008

Back to Weaving


I have had this piece sitting on my work board half finished for a few weeks now, so I thought it was time to put some concentration into completing the necklace.


'Scarlet' Woven Necklace


Close up of the centrepiece of 'Scarlet'


This piece is finger woven with lava, coral and red aventurine together with my handmade lampwork beads. Hundreds of Japanese seed beads have been added into the mix.

The latest on my Anodising quest -

This has certainly become one of my biggest challenges I have taken on. It is not nearly as easy as it first seemed. I have replaced my battery charger with a 30V/5 AMP controllable power supply as a more reliable power source. I am now using the 720 Rule Anodising Calculator to enable me to apply the correct amp and voltage settings according to the surface area of the pieces. It has just been pointed out to me that I was calculating it without taking in consideration that the surface area equals both sides of my pieces, therefore I needed to double my calculation.


Power Supply


My head is swimming right now, there are so many variables and I still haven't had the success I'm after. It's constantly back to the drawing board, but I have learnt so much and obviously need to learn much more. I think I could write a book with all that I have learnt so far!


Tuesday, September 23, 2008

My First Aluminium Necklace


I've been working on my design for my first anodised aluminium necklace and have my pieces ready for the anodising process.

I have cut, filed, sanded, drilled and polished all pieces. I've used a wheel and polish specially made for use with aluminium.


They do resemble faces, but that wasn't the plan!


I am still planning to make some changes to my anodising bath in hope to prevent the current from cutting out. I'm planning to drill holes in the aluminium angle so that the titanium wire will fit snugly in. Caswell's website has a very helpful forum which I need to study a little more, there was an excellent photo of a set up you may like to check out, about 1/2 way down the page.

As I have 14 pieces to anodise, I need to have my racks changed to accommodate them easily. My design is to have the base one colour and the 'nose' section another. I will then need to rivet the pieces together very carefully as not to damage the anodising.

I thoroughly enjoyed working with the aluminium, it is so light weight and responds well to all the facets of metalsmithing with a few exceptions, such as being unable to solder. In saying that I did read that it can be soldered with special solders, but I haven't looked into it any further. I will continue to design with cold connections for the time being, it's a much bigger challenge!

Friday, September 19, 2008

Anodising Aluminium at Home - Success!


Persistence and constant research has finally paid off, I have successfully anodised my aluminium test piece.


Test Piece with Anodised Finish


I made a few changes to my set up, firstly I changed the aluminium bar to an aluminium angle which I thoroughly cleaned. The reason for changing the bar I was using previously was due to an extra ridge on the aluminium which I felt might have reduced the current flow.


Aluminium Angle


I cut a larger piece of roofing lead and folded it over several times, this was advised in research material I had read.


Lead Cathode


A major change which I believed contributed to the success, was changing from aluminium wire to titanium wire for use in the racking system. Titanium apparently conducts the electrical charge more efficiently, whereas aluminium has a tendency to lose the current flow. Titanium is more expensive than aluminium, I paid $15.00 for a metre at A&E Metals, but it was well worth the extra expense. The wire can be used over and over again by cleaning it with steel wool after each anodise.


Titanium Wire for holding Aluminium


The final major improvement was purchasing the correct anodising dyes. These are available from Caswell Inc. If you live in the U.S., the dyes are out at a very cheap price at the moment. Unfortunately the same special price does not spread to Australia. As Caswell has a distributor in Australia they do not allow us to buy from the U.S. site, so Aussies can expect to pay more than double the price at $18.00 per colour, as opposed to $7.45 in the U.S. Worthwhile buying the correct dyes and also Sealer which is also available from Caswell. Once you have soaked the anodized aluminium pieces in the dye for approx. 15 minutes, the piece is then transferred to the sealer mix which has been brought to boiling point on the stove. Retain the boil and immerse the piece for just a few minutes.

I found an anodising procedure chart in The Complete Metalsmith by Tim McCreight handbook. As I no longer have a working scanner, I photographed it, brought it into Photoshop and added some extra notes, printed and placed into a plastic sleeve. This has been invaluable on my workbench throughout the procedure, as I can't rely on my memory. I move straight from the Dye process to the Seal, with no rinsing in between or after the Seal.


Anodising Procedure Chart


The finished anodised results will reflect the amount of work put into the preparing of the aluminium before the anodising process begins. My sample piece has far from a perfect finish as I put very little effort in sanding and preparing the piece as it was simply a practise piece. I am now moving on to my first necklace project incorporating anodised aluminium, these pieces will have to be fastidiously prepared with all sawing, filing, forming and other finishing techniques completed before the anodising process can begin.

Although I have felt a great deal of frustration with all my failed attempts with the anodising process, finally having a success has really made it all worthwhile. I've learnt some valuable lessons, the main one being do not cut corners by purchasing products which aren't the 'Real McCoy'. I would have saved a lot of time if I had the correct wire and dyes to begin with, but in saying that having to analyse each step to fathom where I had gone wrong, really increased my knowledge of the process.

I hope you have enjoyed travelling my journey with me!


Friday, September 12, 2008

The Jeweler's Directory of Decorative Finishes


The Jeweler's Directory of Decorative Finishes by Jinks McGrath


This is another excellent book if you are seeking a good source of information on finishing techniques to metal. It begins with the basic tools and equipment which seems to be the norm for all the jewellery related books. It then supplies valuable information on the how-to, samples and exceptional showcase on each section. The areas covered are Stamps and hammering; Rolling-mill texturing; Fusing; Polished, matt and satin finishes; Etching; Patination and oxidization; Casting; Press forming; Reticulation; Gold and silver foil; Granulation; Enameling; Engraving; Inlay; Chasing and repousse. That's a lot of information for one book to cover, and it is done in a very informative and pleasurable manner.


The Enameling section gives a clear run down on many enameling methods and the preparation needed along with the application and firing procedures. Some samples are shown of enameling on sterling silver and copper. A variety of finished pieces are shown in the showcase section


The Engraving section details the technique of working with a graver, shows samples on silver, brass and copper, and once again a unique showcase of some intricate engraved pieces


The Etching chapter takes you through the basic technique of acid etching and touches on photoetching. Illustrates samples of etched copper, silver and brass. Has a diverse range of pieces in the showcase


Another page in the Etching Section


This section covers the technique of polished, matt and satin finishes. Step by step on how to obtain a high polished surface; how to texture a surface to give a matt finish; how to combine the two techniques of highly polished and matt finishes to achieve a good satin finish. Samples of these finishes on silver, copper and brass. Another stunning showcase


If you are lucky enough to have a rolling mill, something that has been on my wish list for 10 years now, this section covers many different styles of texturing from utilising materials such as feathers, dried leaf, etc. A nice mixture of samples on copper, brass, silver and gilded metal. Featuring another exceptional gallery of finished pieces


This is definitely not one of those books you will look at on one occassion and put back on the shelf never to look at again. It's very inspiring and so many drool worthy glossy photos.

I've checked out Amazon and they have this book available at the moment for $16.49.


Tuesday, September 9, 2008

Reviewed Book Prices


Over the short period of time I have been writing my blog, I have reviewed several jewellery books and given you an inside glimpse of some of the contents.

I am listing the books I have reviewed each linked to their particular evaluation. I have found one of the best priced suppliers is Amazon. These books are all available and I am showing Amazon prices for your information.

Chain Mail Jewelry by Terry Taylor & Dylon Whyte $16.47

Making Silver Chains by Glen F. Waszek $11.21

Creative Silver Chains by Chantal Lise Saunders $13.57

Making Metal Jewelry by Joanna Gollberg $10.17

The Penland Book of Jewelry $23.07

The Earrings Book by Yvonne Kulagowski $28.62

ANODISING ALUMINIUM PROJECT

I will have further news with this project shortly. I'm currently in the process of purchasing authentic anodising dyes as at the moment my experiments have included 'Dylon' dyes, so as to eliminate this as a factor contributing towards the failure of the anodising process, I need to replace this step with the correct product.


Friday, September 5, 2008

Anodising Aluminium at Home - Part 2


I have been through this process numerous times and have not experienced success as yet, but will still record the steps I am making. I am sure I will find the solution to my problem soon and as I am describing my journey of the anodising project, I think the failures should be noted also.

Please refer to Part 1 for the safety precautions and bath preparations.

The piece of aluminium to be anodised needs to have all the work completed first e.g. cut, shaped, hammered, formed, drilled, sanded and polished if desired. In my experiment I am using a scrap piece of aluminium which has been drilled and sanded.

I recommend having a timer for all the steps, I couldn't do without mine ($5.00 from the supermarket).


Timer


I'm going to fast track to the actual anodising step for a moment. The set up includes a strip of aluminium which sits across the top of the bath container. I have drilled a hole in the strip. Using 1.6mm aluminium wire I have doubled it up, squeezed it together with pliers and fitted it very tightly into the hole. The wire is long enough to prepare the other end in the same way and tightly wedged into the aluminium piece to be anodised so that the piece is completely submerged in the acid bath. I keep it attached in this way to complete the whole process starting with -


Wire in Aluminium piece to be Anodised


1. Degrease - submerge in the jar of detergent for 5 to 15 minutes


Degreasing aluminium


2. Place in rinse bath for 2 minutes


Rinse bath of Distilled Water


3. Immerse in Caustic bath for 1 - 3 minutes


Soaking in Caustic Soda bath


4. Rinse under a running tap for 3 - 5 minutes

5. Place in Nitric Bath for 2-3 minutes to ensure the grey colour has been removed


Soak in Nitric Acid Bath


6. Place in rinse bath of clean distilled water for 2 minutes then rinse under running tap for 3-5 minutes

7. Anodising Bath - Using a piece of roofing lead, I've cleaned it with steel wool first, placed it on the left side of the bath with 2/3rds immersed in the acid/distilled water solution. I'v placed the aluminium bar with the attached piece of aluminium to be anodised across the top of the bath. The aluminium piece should be completely submerged and a distance away from the lead. I'm using a 12V battery charger, the black connector is attached to the cathode with is the lead. The red connector is attached to the anode wihich is the aluminium bar.


A piece of Roofing Lead as the Cathode


Aluminium piece across the bath which I have now changed with a more substantial Aluminium Bar, the Aluminium piece to be Anodised I have now fixed through a hole in the Aluminium Bar


The ampmeter on the battery should sit between .5 and 2 amps. Many bubbles form around the lead cathode and fizzes.


The Ampmeter on the Battery Charger


The Battery Charger


Now this is where I am going wrong. The amps drop back to zero which indicates I no longer have contact. I'm having difficulty fixing the aluminium wire to both the bar and the piece to be anodised sufficiently to result in a tight connection, hence the electrical charge fails to travel down the bar, through the wire and into my work piece.

As soon as I have overcome this problem, I will continue the process. Of course if any of my readers can help me out here, I'd be very much appreciated!


Tuesday, September 2, 2008

Anodising Aluminium at Home - Part 1


As I mentioned in an earlier posting I have become intrigued with the idea of anodising aluminium to use in a new line of jewellery. I am now embarking on that challenge and am inviting you to come on a journey with me through the process of setting up and hopefully being successful with this project.

I have done endless research on the process and have now began to source my supplies and set up the different stages needed. Before I go into my setting up process, I must make it very clear that this process involves working with dangerous acids. I can't emphasise enough that you must take extreme care when handling the products, wearing safety gear and working in a well ventilated area.

I had read that sourcing the chemicals may be a problem but I found they were readily available here in South Australia at Ace Chemicals. I bought 2.5 litres of Sulphuric Acid 98% Solution; 2.5 litres of Nitric Acid 70% and 5 kg Caustic Solda crystals (Sodium Hydroxide Pearl). Total cost of the chemicals $177.00, and the quantities I bought should last me some time.

The very first stage is to find a suitable area to work with acids. I cleared a bench under a carport outside where I have plenty of fresh air circulating, as it is an open space with no doors and only partially closed sides.
Next step is to wear suitable safety glasses and a respirator, both available from hardware stores. To complete the safety attire, a pair of strong rubber gloves and a heavy duty plastic apron. I'm still hunting for a suitable apron, for now I am wearing a heavy leather apron which nearly weighs me down to the ground.


Safety Glasses and Apron


Respirator


Gloves


I made all the 'baths' first, labelling each one. I'll firstly tell you how I prepared each bath, then I will describe each step of anodising in Part 2 which will then make the purpose of each bath clear. Keep in mind all my preparation is done on a reasonably small scale as it is for the purpose of small jewellery components only. If you were planning on anodising car parts, etc. it would need to be on a larger scale.
ALWAYS ADD THE ACID TO THE WATER IN ALL THE BATHS, NEVER THE WATER TO THE ACID
HAVE A BUCKET OF WATER WITH SODIUM BICARBONATE (BAKING SODA) MIXED IN. IF ANY SPILLS USE THIS MIXTURE TO MOP UP AS IT NEUTRALISES THE ACID.

Baking Soda


Degreaser - In a small jar with a screw top lid I have added a heavy duty detergent mixed in cold tap water.
Rinse Bath - In a 2 litre icecream container I have added a couple of inches of distilled water - now known as demineralised water and available from the hardware store or supermarket. You will need quite a lot of this, I bought a 4 litre container and found I needed another. If you can buy it in bulk, it would work out much cheaper, I'm paying about $6.00 for 4 litres, something I need to source in larger quantities.

Distilled Water


Caustic Bath - In a 2 litre icecream container I added 1 litre of water and then 160 grams of Caustic Soda.

Caustic Bath


Nitric Bath - In a 2 litre icecream container I poured in 1 litre of water and to that very carefully added 250ml of Nitric Acid.

Nitric Bath


Anodising Bath - In a reasonably large plastic container I add 3.5L of distilled water, then carefully poured in 700ml of Sulphuric Acid. I read the quantity to be Sulphuric Acid and distilled water 20% by volume.

Anodising Bath


I have made one run through of the process at this stage without success as I required some aluminium wire which I have finally sourced and am now waiting on delivery. Hopefully I will receive that soon and will then continue onto Part 2, showing the step by step process and how to set the anodizing bath up ready for connection to a battery charger for the electric current needed.


I'm enjoying my new challenge and am looking forward to a successful result. It's not an overly expensive project to set up, but the most time consuming and frustrating part is finding suppliers for all the items that are needed.


Friday, August 22, 2008

My Latest Publication


Finally, I'm famous!! Well that may be a slight exaggeration but Glass and Splinters has been featured in this month's Australian Beading magazine, and I'm extremely happy. 2 pages have been dedicated to my profile with a generous amount of photos of my beads, my woven necklace and of course a photo of me at work on the torch. Kelly Norton, the Editor of the Australian Beading magazine approached me quite a few months ago asking if the magazine could do a feature on me, and finally it is here.


I thought I would give those of you who don't have the luxury of buying a copy a view of the pages.


I must admit, it is so satisfying to see my name and creations in print, makes all that hard work worth it!


Australian Beading is a great magazine, 139 pages on nice quality paper. Full of interesting tutorials and articles - and no I am in no way affiliated with the magazine, but felt it deserved a mention.